

Before getting started in Azure, complete the following steps in Unleash to ensure you have access to the information you need:
Navigate to the Control Center in Unleash and click on the Sign-In page.
Under SSO, click Configure.
Select SAML as the authentication method.
Choose Azure as your identity provider.
After SAML is configured, users will no longer be able to sign in using your existing SSO Identity Provider (such as “Sign in with Microsoft”). All authentication will be routed exclusively through Microsoft SAML, and alternate SSO methods will be disabled.
Once you've completed these steps, open your Azure account and follow the instructions below.
Step 1: Creating an App
Go to your Azure Portal.
Click Enterprise applications and then click +New application.
.png")
.png")
Step 2: General Settings
Click Create your own application.
Name your App Unleash.
Select the radio button: Integrate any other application you don’t find in the gallery (Non-gallery).
Click Create.
.png")
Step 3: SAML Settings
On the left-side menu, click Single sign-on, then click SAML.
In the Basic SAML Configuration box, click Edit.
Under Identifier (Entity ID), enter, unleash-tech.
Under Reply URL (Assertion Consumer Service URL), paste the Single Sign-On URL from the Azure SAML configuration page in Unleash.
Click Save.

.png")
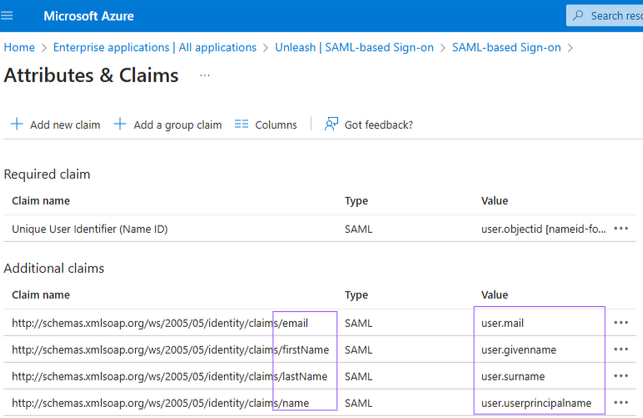
In the Attributes & Claims box, click Edit.
Click +Add new claim.
When adding and editing claims, please make sure they follow the table when inputting values so that they match the image below. You may need to delete additional claims already present and reenter them as displayed in the image.
email
user.mail
firstName
user.givenName
lastName
user.surname
name
user.userprincipalname
Click on the three-dot menu in the Required claim section.
Click on Choose name identifier format and change the inputs to match the screenshot below.
.png")
Copy the App Federation Metadata URL and paste it into the corresponding field in the Azure SAML configuration page in Unleash.

Step 4: Finish
Your app should have been successfully created. All that’s left is assigning individual users or user groups access to the newly created SAML app.