

As your company grows, the number of Slack channels for employees to ask questions increases as well, such as #ask-it, #technical-support, and #sales-questions. These channels can receive hundreds of weekly questions, overwhelming the channel managers. Employees might wait hours or days for help while managers answer repetitive questions.
By automatically responding to questions asked in Slack, the Unleash Slack Channel Assistant can significantly reduce channel managers' time spent on repetitive queries. This allows managers to focus on more important issues while the bot provides instant responses to the rest of the channel, thereby unblocking them more efficiently.

Adding a Slack Channel Assistant
The Slack Channel Assistant enhances communication and information flow within your Slack channels. In Unleash, you create an assistant, assign it to a specific channel, and configure its settings, this configuration acts as the backend for the bot. Admins and bot creators can define data sources and adjust preferences to tailor the assistant to the channel’s needs.
Once active, the bot monitors channel conversations, detects user questions, and responds using the connected data sources. This setup ensures the assistant delivers accurate, relevant, and timely answers.
By default, only administrators can create channel assistants in Slack. However, admins can grant permission for other users to create assistants. If you’re unable to invite an assistant to your channel, contact your workspace admin.
Note: Before getting started, please ensure that your workspace admin has installed the Unleash app for Slack or a Custom Slack App and has given permission to users to invite the bot to channels.
To install the Unleash App for Slack or Custom Slack App
Open Unleash.
Click on
 Control Center.
Click on
(1).png) Experiences.
Experiences.On the Unleash app for Slack section, click +Create New and follow the steps to install the app.
Verify in Slack that the app was installed.
Follow the steps below to invite and configure the bot.
Step 1 | Inviting the Bot the Channel
To invite the bot to the channel:
Open the Slack channel you want to add the bot to.
Type /invite @Unleash.
If you've created a custom app and want to create an assistant with this app, simply type @your-custom-app-name.
Hit Enter.
When you add the Unleash app to a Slack channel, a message will appear only be visible to you with two action buttons below the message.
Configure Assistant – Opens the bot in Unleash Assistants so you can start setting up its data sources and preferences.
Learn more - Opens the instruction page on how to integrate Slack as a source of knowledge in Unleash.
Note: Channel memebrs without permissions to create a Slack Channel Assistant will get the message without the buttons
Click Configure bot to start configuring the assistant’s preferences, or you can create an assistant manually in Unleash, following the steps below.
Step 2 | Creating a Slack Channel Assistant
To create a Slack channel assistant:
Click on
.png) Control Center.
Control Center.Click on
.png) Assistants.
Assistants.Click +New Assistant.
Click Slack Channel Assistant.
Note: Workspace admins can choose to disable members from creating Slack Channel Assistants. If this option is disabled, clicking +New Assistant will not allow you to create a Slack Channel Assistant. In this case, you’ll need to ask your admin for permission to enable this feature, or request that they create the assistant for you and then transfer its identity to your Unleash account so you can manage it directly.
Paste the Slack Channel ID of the channel you want to configure the bot for into the text box.
This will only work if the bot has already been invited to the channel, following the steps outlined above.
To find the Slack Channel ID
Open your Slack Workspace.
Open the channel and click on the channel name to open the channel details.

Scroll down and copy the channel ID.

Paste the channel ID into the textbox.
.gif)
Step 3 | Configuring the Assistant’s Sources
Identity
By default, the person who creates the assistant is set as its identity. The assistant operates on behalf of the selected identity, using that user’s permissions to access data and generate responses. Assigning a different identity allows that user to edit the assistant’s connected sources and permissions. When an identity is reassigned, the new identity holder will receive a Slack notification confirming the transfer and will gain the ability to make edits.
All users with full access to the assistant, as well as admins, can also make edits. The sources that can be connected, and the permissions for those sources, are determined by the selected identity, meaning only data sources accessible to that user can be used.
Changing the identity may affect which data sources are available to the assistant.
Sources
The sources you can connect for the assistant include both the apps you or your workspace admin have integrated with Unleash and the knowledge stored within the Unleash app. The data from these resources will be used to answer any questions directed to the bot. By narrowing the scope and prioritizing specific resources, you can improve the quality of responses, ensuring that only the most relevant information is used to answer questions.
To configure the assistant’s sources:
Click on + Add App.
Select the relevant app you want to connect.
If you have multiple links connected for an app, a popup of the links you have access to will appear. Click on the relevant account.
To add resources from Unleash, select Unleash.
Under Wikis, choose the wiki/s you would like to include.
You can add Unleash again as an app and select additional wikis.
Narrow the scope of the resources the bot will use by clicking on +More Filters (optional).
As you apply filters, the system dynamically updates the available options, ensuring that new filters remain within the scope of your current selection. Three constants are: Specific Resource, Last Edited and Type.
Specific resource:
Search for a resource and click the checkbox next to the relevant resource to check specific resources as data sources.
You can select as many as you want.
Once done, click Select.
Last edited: Establish specific timeframes for the bot to draw answers from when responding to a question.
Choose a time filter or scroll to the bottom and select Custom.
Select a time from Before, After, or Between.
Select the dates.
To save, click out.
Type:
Select the type of resource available for that app.
To add another app, click +Add App (optional).
You can activate knowledge prioritization when you have more than two app sources configured. The assistant will seek answers within the prioritized resources you set. If no answer is found, it will expand its search to other connected resources.
To activate knowledge prioritization:
Click Knowledge Prioritization
.png "priority new (1).png") on the sources to prioritize (you can prioritize more than one).
on the sources to prioritize (you can prioritize more than one).In Slack assistants, the data source link assigned to a specific channel takes precedence over all other knowledge sources, regardless of their assigned priority.
To include the channel the assistant is in as a knowledge source, you will need to add it manually.
Click Save.
Link Indications
If any card contains a file, the Assistant will scan and utilize those files to provide more accurate answers
Private wikis and links that are set as a data source will be visible as answers delivered by the bot in channels. Private wikis and links are identifed by this icon:
.png)
Links that are still syncing to Unleash are displayed with this syncing icon:

If the selected link fails to sync, an indication will appear below the app, prompting you to try reconnecting the link on the Unleash app connection page.
If the link was removed, an indication will appear below the app.
When a link is selected within 24 hours of its initial connection, a message informing you that full AI functionality will be available within 24 hours of the connection time will be displayed.
Step 4 | Configuring Bot Behaviour
Configure the bot to activate based on your preferences and specify domains where it should remain inactive.
Bot Activation
Select the bot's sensitivity, which determines when the bot will return a response. You can adjust this setting based on the type of queries you are handling in the relevant channels. The default sensitivity is set to respond to explicitly mentioned.
To configure bot activation:
Click on the dropdown for Bot Activation.
Select:
 Every Message: Receive responses to all questions.
.png "Icons Configuration(1).png") Work Related Question: Get answers only for work-related inquiries.
Work Related Question: Get answers only for work-related inquiries.
 Explicitly Mentioned: Responses are provided only when the bot is mentioned.
Note: If the bot is set to Explicitly Mentioned, you’ll need to type @Unleash or @your-custom-app-name followed by your query to interact with it.
Allow Responses to Messages from Other Bots
Toggle on to allow this bot to activate when another bot sends a message in the channel. Toggle off to restrict activation to messages from human users only.
Exclude Email Domains
Specify domains to block the bot from responding to users with email addresses associated with those domains. This ensures the bot remains inactive for specific organizations or groups as needed.
To exclude domains:
Type the domain into the domain box (eg: acme.com).
Hit Enter.
You can repeat this for multiple domains.
Step 5 | Configuring Instructions
The instructions are set to the default settings, allowing you to configure the response length. The advanced settings button enables you to customize and control the assistant’s behavior, tone, and response style by giving free text instructions.
Default Settings
Response Length
Configure the response length that the assistant will use to deliver answers. You can set the response length to short, standard, or long, with the default being standard.
To configure the response length:
Click on the dropdown for Response Length.
Select:
 Short: Typically consists of 1-2 sentences, providing quick, straightforward answers.
 Standard: Slightly longer, usually a paragraph or a few sentences, offering more detailed explanations.
 Long: In-depth and comprehensive, often spanning multiple paragraphs or containing detailed explanations.
Adjust Tone
Configure the tone that the assistant will adopt when delivering answers. You can set the tone to neutral, assertive, and confident, with the default being neutral.
To adjust the assistant’s tone:
Click on the dropdown for Adjust Tone.
Select:
.png "Icons Configuration(4).png") Neutral: This is the default tone. It mirrors the language style documented in your resources and provides a balanced and professional response.
Neutral: This is the default tone. It mirrors the language style documented in your resources and provides a balanced and professional response..png "Icons Configuration-1.png") Assertive: This tone is direct and clear, communicating the necessary information with authority. It is used when conveying a strong stance.
Assertive: This tone is direct and clear, communicating the necessary information with authority. It is used when conveying a strong stance. Confident: This tone is positive and assured, instilling confidence in the customer. It is used when reassuring the customer or demonstrating expertise.
Note: Switching between standard and advance resets the previous values without saving them.
Advanced Settings
The Advanced Settings button enables you to personalize the assistant’s behavior, tone, and response style by entering custom free-text instructions. You can provide detailed instructions up to 16,000 characters. For best practices, please see this article.
You can provide instructions to tailor:
Tone (e.g., formal, casual, assertive, confident).
Response Length (e.g., concise, moderate, detailed).
Role and Behavior Guidelines (e.g., acting as a professional customer support representative or a knowledgeable expert in a specific field).
Example: As an HR agent in Acme's Ask-HR channel on Slack, your role is to provide prompt, accurate, and empathetic responses to employee inquiries. Use a professional yet approachable tone, ensuring your answers are clear and actionable. Where applicable, include links to relevant resources or policies.
Step 6 | Configuring Preferences
Require expert validation before publishing an answer
To elevate the precision of responses delivered by the Unleash bot in your Slack channels, you can designate trusted channel experts to perform pre-validation of the bot's responses via the assistant feature. When a user poses a question in Slack, Unleash will first present the response solely to designated knowledge experts within the channel. These experts have the authority to approve or disapprove of the generated answer. Once validated, the response becomes visible to all members of the channel along with any related articles or questions (if available).
Experts will receive the answer for approval via a direct message from the bot.
To set expert validation before publishing an answer:
Toggle on Require expert validation before publishing an answer.
Select the experts for the channel.
You can select multiple experts.
Optional:
Notify users of pending review:
Check Display “Awaiting Expert Approval" to inform the user that their question is under review.
Approval notification:
Check React with ✅ upon expert approval to let the user know their question has been approved.
Disapproval notification:
Check React with 🤷♂️ upon expert disapproval to inform the user that their question was not approved.
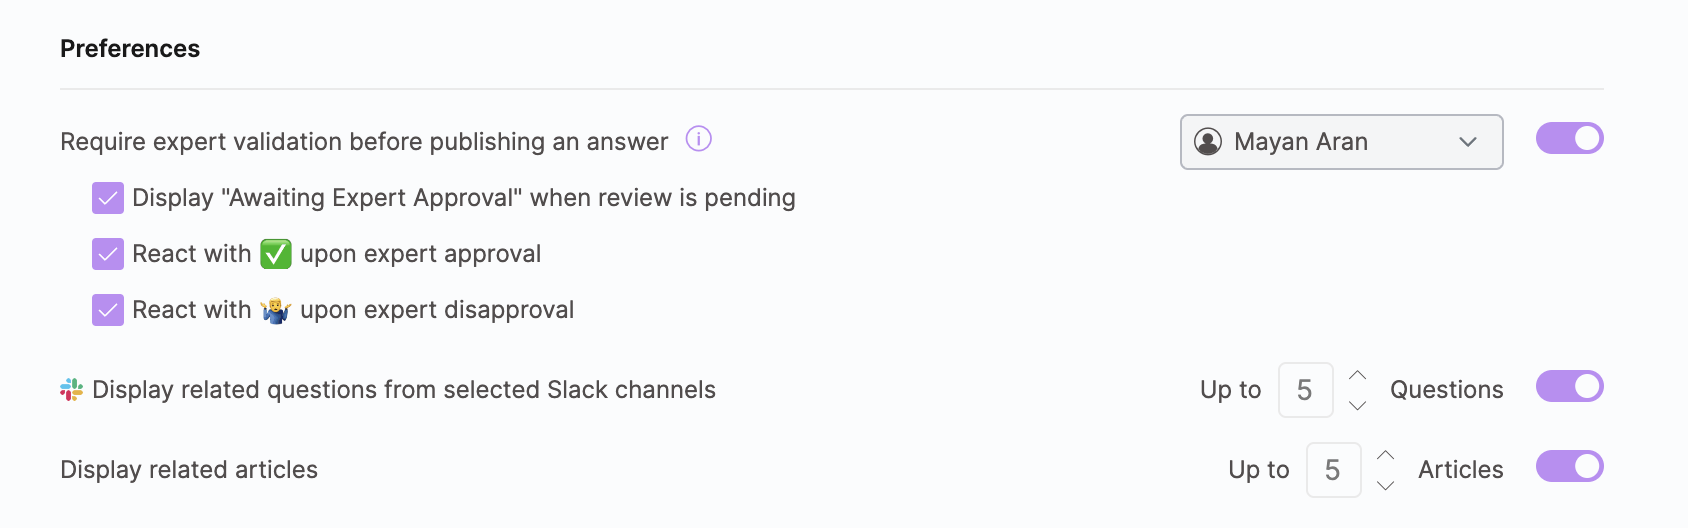
Display related questions from selected Slack Channels
Allows the bot to display related questions and answers sourced from specific Slack channels designated as knowledge bases in the "Knowledge from Apps" section of the Assistant. You can configure the bot to show a minimum of 1 answer and a maximum of 5 answers.
Example: A user asks a question in Channel A. The bot identifies that a related question was answered in Channel B and displays the answer from Channel B to the user in Channel A.
Display Related Articles
To reduce noise from related articles displayed by the bot when answering your questions, you can customize the number of Related Articles shown, up to a maximum of 5. When the toggle is turned off, the number of related articles generated by the bot will vary based on the total number of available articles. By default, this setting is configured to display 5 articles.
React with 👀 icon when searching for a suitable answer
When a channel member asks a question, the bot will add a reaction (👀) to the message. This reaction indicates that the bot has seen the question and is processing it. The reaction serves as a notification to channel members that the bot is active and working on providing an answer.
React with 🤷♂️ icon when the bot can’t find an answer
When a channel member asks a question, and the bot cannot find a suitable answer for the question, the bot will add a reaction ( 🤷♂️ ) to the message. This allows channel members and the assistant creator to see where documentation is missing and to add it to the relevant knowledge platforms.
Specify reasons for feedback
We encourage feedback on the bot's generated answers to enhance our algorithm. Channel members can give a thumbs-up or thumbs-down on the helpfulness and accuracy of the answer generated by the bot. When negative feedback is received, we enable the user to provide a reason for the feedback and, if possible, add the URL for a correct answer, allowing us to understand better what went wrong. You can toggle on/off the option to allow users to specify reasons for negative feedback according to your preferences.
Action Buttons
Action buttons appear whether the bot provides an answer or no answer is available, enabling channel members to take quick actions directly. This setting can be configured by users who have Full Access only. By default the Action Button Customization option is toggled off.
To configure Action Buttons:
Toggle the Action Button Customization option to on.
Add text/URL for
Section Title (optional) - Title for action button section in Slack.
Description Text (optional) - Text describing the purpose or context of the buttons.
Button Text - The label that will appear on each button.
Button URL - The URL the button will redirect to when clicked.
To add more buttons, click +Add Button.
After adding at least one button, you will be able to see a preview of how the action button section will appear in Slack.
To preview the button, click on the preview icon
 next to the action button toggle.
Click Save.
If you toggle off Action Buttons after configuring them, the Action Button section will be removed from Slack. However, when you toggle them back on, your previously configured settings will be restored.
Note: A maximum of 3 action buttons can be configured
.gif)
Step 7 | Asking Questions
With the bot invited and the assistant set up, all that’s left is for you and your channel members to ask questions and watch as the bot answers in seconds. The bot will provide answers along with the source of the information, allowing you to click for more details and related articles. Additionally, you will see a "Was this helpful?" prompt. Click on the relevant feedback option.
Inline references will not be displayed for people-related questions or lookup queries (e.g., "Where can I find this document?") when the answer itself includes the necessary information. Additionally, if the entire answer is derived from a single source, an inline reference will also not be shown.
Step 8 | Creating Cards from Slack
Unleash automatically creates a dedicated Wiki shared with all channel members when you add the bot to a channel. Channel members can create cards from their Slack conversations and save them to Unleash, enriching the knowledge base with answers the bot can use to respond to questions.
To create a card from Slack:
In any chat or channel, right-click on the three-dot menu of any message/question/answer.
Click Create Card.
If you do not see this option, try clicking on More message shortcuts.
This action will open a card creation page where you can add specific knowledge and assign it to a Wiki within Unleash.
Click Create.

Recapping Messages
The /recap command summarizes conversations from your channels quickly, allowing you to catch up on key points. The summary will only be visible to you and not to other people in the channel unless you share the recap message. If you get stuck, just type /recap help into your Slack channel and hit enter to get guidance on how to use the command.
Recapping messages:
From any channel, type
/recap.To refine and improve the summary response, add relevant modifiers:
Time: Use
/recap 7 daysto get a recap from the last 7 days.Length: Use
/recap long and detailedto receive a more detailed summary.Tone: Use
/recap make it simplefor a simple summary.Topic: Use
/recap last 30 days about project X.Combine multiple modifiers, like
/recap long and simple, to customize your recap further.Add free text, such as
/recap from the last 2 weeks, make it as precise as possible and use bullets, for more tailored responses.
Hit Enter.
To share a recap with the channel, click on the Share button that is displayed with the recap.
A message will be sent to the channel with a mention of who shared the recap.
Note: If no time frame is specified, Unleash will default to summarizing all content created in the channel over the past day, including threads.
Recapping threads:
From the same channel as the thread, copy the link of the first message within the thread.
Type
/recap [link].Note: you can refine and improve the summary response by adding any of the relevant modifiers described above like
/recap [link] detailed and long, in bullets.
Hit Enter.
Note: You can only paste links from the channel you are currently in.
.gif "ScreenRecording2024-11-19at13.17.25-ezgif.com-speed(1).gif")
Limitations for Slack recap:
To use the command in channels, the Unleash bot should be invited to the channel.
Unleash will not summarize audio and attachments.
The
/recapis only available in channels and not private DM’s.Chats will be summarized to include up to 500 messages and a maximum of 100 threads.
If you’ve invited the bot to a channel solely for recaps, update the bot activation setting in the Assistant to Explicitly mentioned. This ensures the bot doesn’t automatically respond to questions in the channel. Learn more about bot activation here.